Archive for category Windows

Sometimes you have big improvements

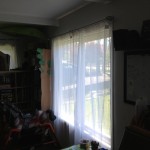
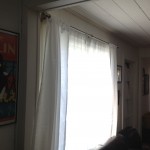
And sometimes it’s little tiny steps that make your home better. We have two large picture windows that had blinds that were left in the house from the previous owner. I have always hated blinds. They are ugly and.. well ugly. I wish I could find the words to discuss my hatred but it’s irrational and who can put that sort of thing into words. Something always took priority over spending the money on the rods and curtains. It adds up so very fast.

But this weekend I put my foot down and my house is more beautiful because of it.

Also this winter we took down our pear tree which we knew we wanted to add in some shade structures if we actually wanted to be able to host anything in the summer. So my husband but everything together with some assistance from our four year old.

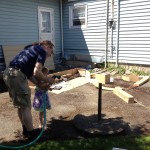
It was easy to assemble, seems sturdy, has little lights and a solar panel. You can get it from Bed Bath & Beyond.

We are also getting a long rectangular structure that we hope to be able to leave up over winter too so that the kiddo can play outside more even on rainy days. Not that I think that she will melt but I would like somewhere to hang out too.

I am having a hard time because we have decided not to do any big projects but I am being project nickled and dimed. The only person putting the pressure on myself to be consistantly doing something is me. I know that in the end I immediately benefit from the work we do, but I envy those homeowners that are more than happy just to reside in their home and not constantly be poking it with a stick. It just never stops.

I just need to work harder on finding a healthy balance.

Casings!

… and sills and jambs and doors and floor patches (oh my).

Lots of progress since the last post.

Two weeks ago I got the prehung door in, which was a bitch and a half to do solo. I plumbed it up and the door wouldn’t close. It’s a solid MDF core semi-custom Jeldwen door, so it’s pretty heavy. I had to do lots of adjusting and re-shimming to get the door to swing shut, and I didn’t realize until just yesterday when I was putting the casings on that it was actually seriously out of plumb, because the door was sagging in the frame on the top hinge. Once I did the thing with the long screw into the framing, it squared right up and I was able to re-adjust the frame so it was plumb. A little loosening of the screw adjusted the door so the latch would go into the strike plate. It’s a little tough to close, but completely within acceptable limits.

The closet door jamb was easy by comparison, and hanging the bifold doors was a snap. Unfortunately, they’re basic unfinished slab doors which suck down the paint, so I’m going to have to give it a third coat (at least) so as not to see dark wood grain through the white.

I also built the window jambs and sills. This proved to be difficult. I’m using MDF, so it doesn’t plane very well, so I had to resaw the boards to narrower and narrower widths on the table saw to get them to fit property. And for some reason I couldn’t get them tight to the window, so there’s about a 3/32″ gap that I’ll need to fill in with caulk.

Last weekend I built all the lintels. I knew I wanted to do a keystone design, but the problem was how to get a three-piece lintel to have nice tight joints and all be on the same level plane. I’ve been planning on getting a pocket hole kit for eventually doing built-ins and cabinets, so I went ahead and ordered this one and used it to mate up the lintel pieces with the keystone. I made a jig to make it a repeatable process, which I’ll keep around to make more in the future.

Yesterday I got the nailgun back out and put up all the door and window casings in the bedroom (I still have to do the simple casing on the inside of the closet).

The door and window casings in the hall will have to wait until I can saw or plane off a quarter inch of the existing jambs. They were built to be even with the old 3/4″ tongue-and-groove planks, so now that there’s 1/2″ drywall there’s too much jamb. Planing seems like it would take forever, but I’m not sure how to get a controlled saw cut. Maybe I need to buy a jigsaw.

Next week I clean up enough sawdust around the edges to put on the baseboards. I’ll be using 1/2″ x 5 1/2″ MDF boards, but I’m thinking that a square edge on top will be boring and tend to collect lots of dust, so I think I’m going to cut the top at a 45° angle. Yay tablesaw!

Also, back when the room was still open framing, one of our cats liked to use the closet corner as a scratching post. Unfortunately, the mere existence of drywall and paint on that corner didn’t discourage him, and he scratched a hole in the paint. I sanded it, patched with patching compound (I also patched the socket cuts where the hole was too big for the plate), and primed. When I do touchup painting, I’ll paint them, and then screw 4″ of plexiglas on each side up from the baseboard to higher than he can reach. Damn cat.

Jen’s had some luck in using mineral spirits and Murphy’s Oil Soap to get the mastic off the floor, starting in the hall. But nothing else we’ve tried so far has worked as well as the time I unknowingly spilled a bottle of air compressor oil on my way out of the room and left it there overnight. So maybe we’ll just get a big bottle of light oil, mop it onto the floor and clean it off the next day. Seems plausible. Right?


Next on the agenda

  • Apply border
  • Wall plates for the plugs
  • Install door jamb and bifold doors for the closet
  • Install prehung bedroom door
  • Install window jambs and sills
  • Install casings (mostly)
  • Patch floor where old wall floor plates used to be
  • Fill and paint nail holes
  • Touch up painting
  • Install plexiglas corner protector
  • Clean old linoleum mastic off the floor
  • Move my daughter and all her stuff in

P.S. Our friend Erin came over and painted clouds on the blue-sky ceiling. And they look gorgeous.

Tags: , , , , ,

Still Here

Right. The earth did not open up and swallow us whole along with our house.

The back bedroom project is still underway, though. After gutting it back in March and April, we pretty much ran out of time and money. In May I was able to get all the framing done: I filled in the existing exterior door, framed two windows, added a real closet, and created a rough door opening where the end of the hallway once was. In June or thereabouts I was able to buy a roll of wire and run the almost all the electrical. And there I stopped for a couple of months.

Luckily, Jen had some stock options from her job that became sellable in August, so we finally had the money to get all the remaining stuff. Last week I took advantage of some time off work and finished the rough electrical and had it inspected (passed except for one minor issue with the closet light fixture placement). I also installed the folding attic stairs (I was able to do it entirely myself with the assistance of our drywall lift — thanks Jen!)

This morning, I went to Home Depot and ordered all the plywood, drywall, joint compound, doors, tar paper, light fixtures, switches, receptacles, etc. that I’ll need to complete (almost) everything. It gets delivered on Tuesday, so I get to spend this weekend doing everything that I can get done short of having the materials on hand: clean up the room, fill in all the floor/ceiling holes with firestop foam, pull the vinyl siding off the relevant sections of wall, flash the rough window openings, etc.

No pictures for this post, but I’ll take plenty as I work on everything next week.

Tags: , , , , , ,

Bedroom Remodel Weekend 1

Last weekend I started on the back bedroom/hallway project. The plan is:

  • Gut down to the studs
  • Frame in the door to the outside
  • Add a window to that wall
  • Take out the existing closet wall and move the doorway back to the bathroom wall
  • Add a real closet and a reading nook
  • Rewire properly
  • Add attic stairs to the hallway ceiling
  • Lay down a plywood floor in the attic for storage
  • New drywall and moldings

Before

Saturday we had a lot of social appointments, so I only had time to pull down all the trim and moldings.

Casings down

Window casings too

Sunday I got out the big prybar and framing hammer and took down all the tongue and groove boards on the walls. I’ve pulled all the nails out and I’m hoping to be able to get something for them on Craigslist.

The hallway

The closet

Outside walls

Kitchen wall

Interestingly, the shared wall to the kitchen shows two framed-in doorways, one narrow and one normal size. I suspect that originally the hallway ended in a linen closet and the access to the back bedroom was through the kitchen approximately where the wall ovens are now. Supporting this theory is the fact that the vertical framing around the current bedroom doorway is kinda rough-sawn and that the stud on the kitchen wall opposite the end of the bathroom wall has lots of nail holes in it.

Oh, and also, apparently nobody who ever worked on this house ever heard of a header over windows and doors. The existing doorway is non-load bearing and so doesn’t need one, but the existing window, outside door, and framed-in doors on the kitchen wall are all on exterior or load-bearing walls. None of them have any more than the top plate 2×4. It’s a wonder this house isn’t sagging more than it already is.

Sometime this week I’ll take an hour and pull down and bag up all the blown-in insulation in the walls. Then next Saturday I knock down the closet wall and pull down the ceilings. That means a huge pile of rockwool insulation on the floor so that might be all I can get done in a day.

Pulling nails amid the pile of junk lumber

I also need to get my permit renewed so I can be all proper and legal.

Tags: , , , , ,

By The Way…

I need to fix my screens:

Tags: