Posts Tagged demo

Seriously?!

At some point, you just have to wonder if the previous owners crossed the line from “blithering idiot” to “criminally insane”.

Since my roommate moved out, I’m going to break down the wall between his room (my old room) and his boys’ room (the former library, TV room, etc.) and make one big 20’x15′ bedroom. You can see the first step here:

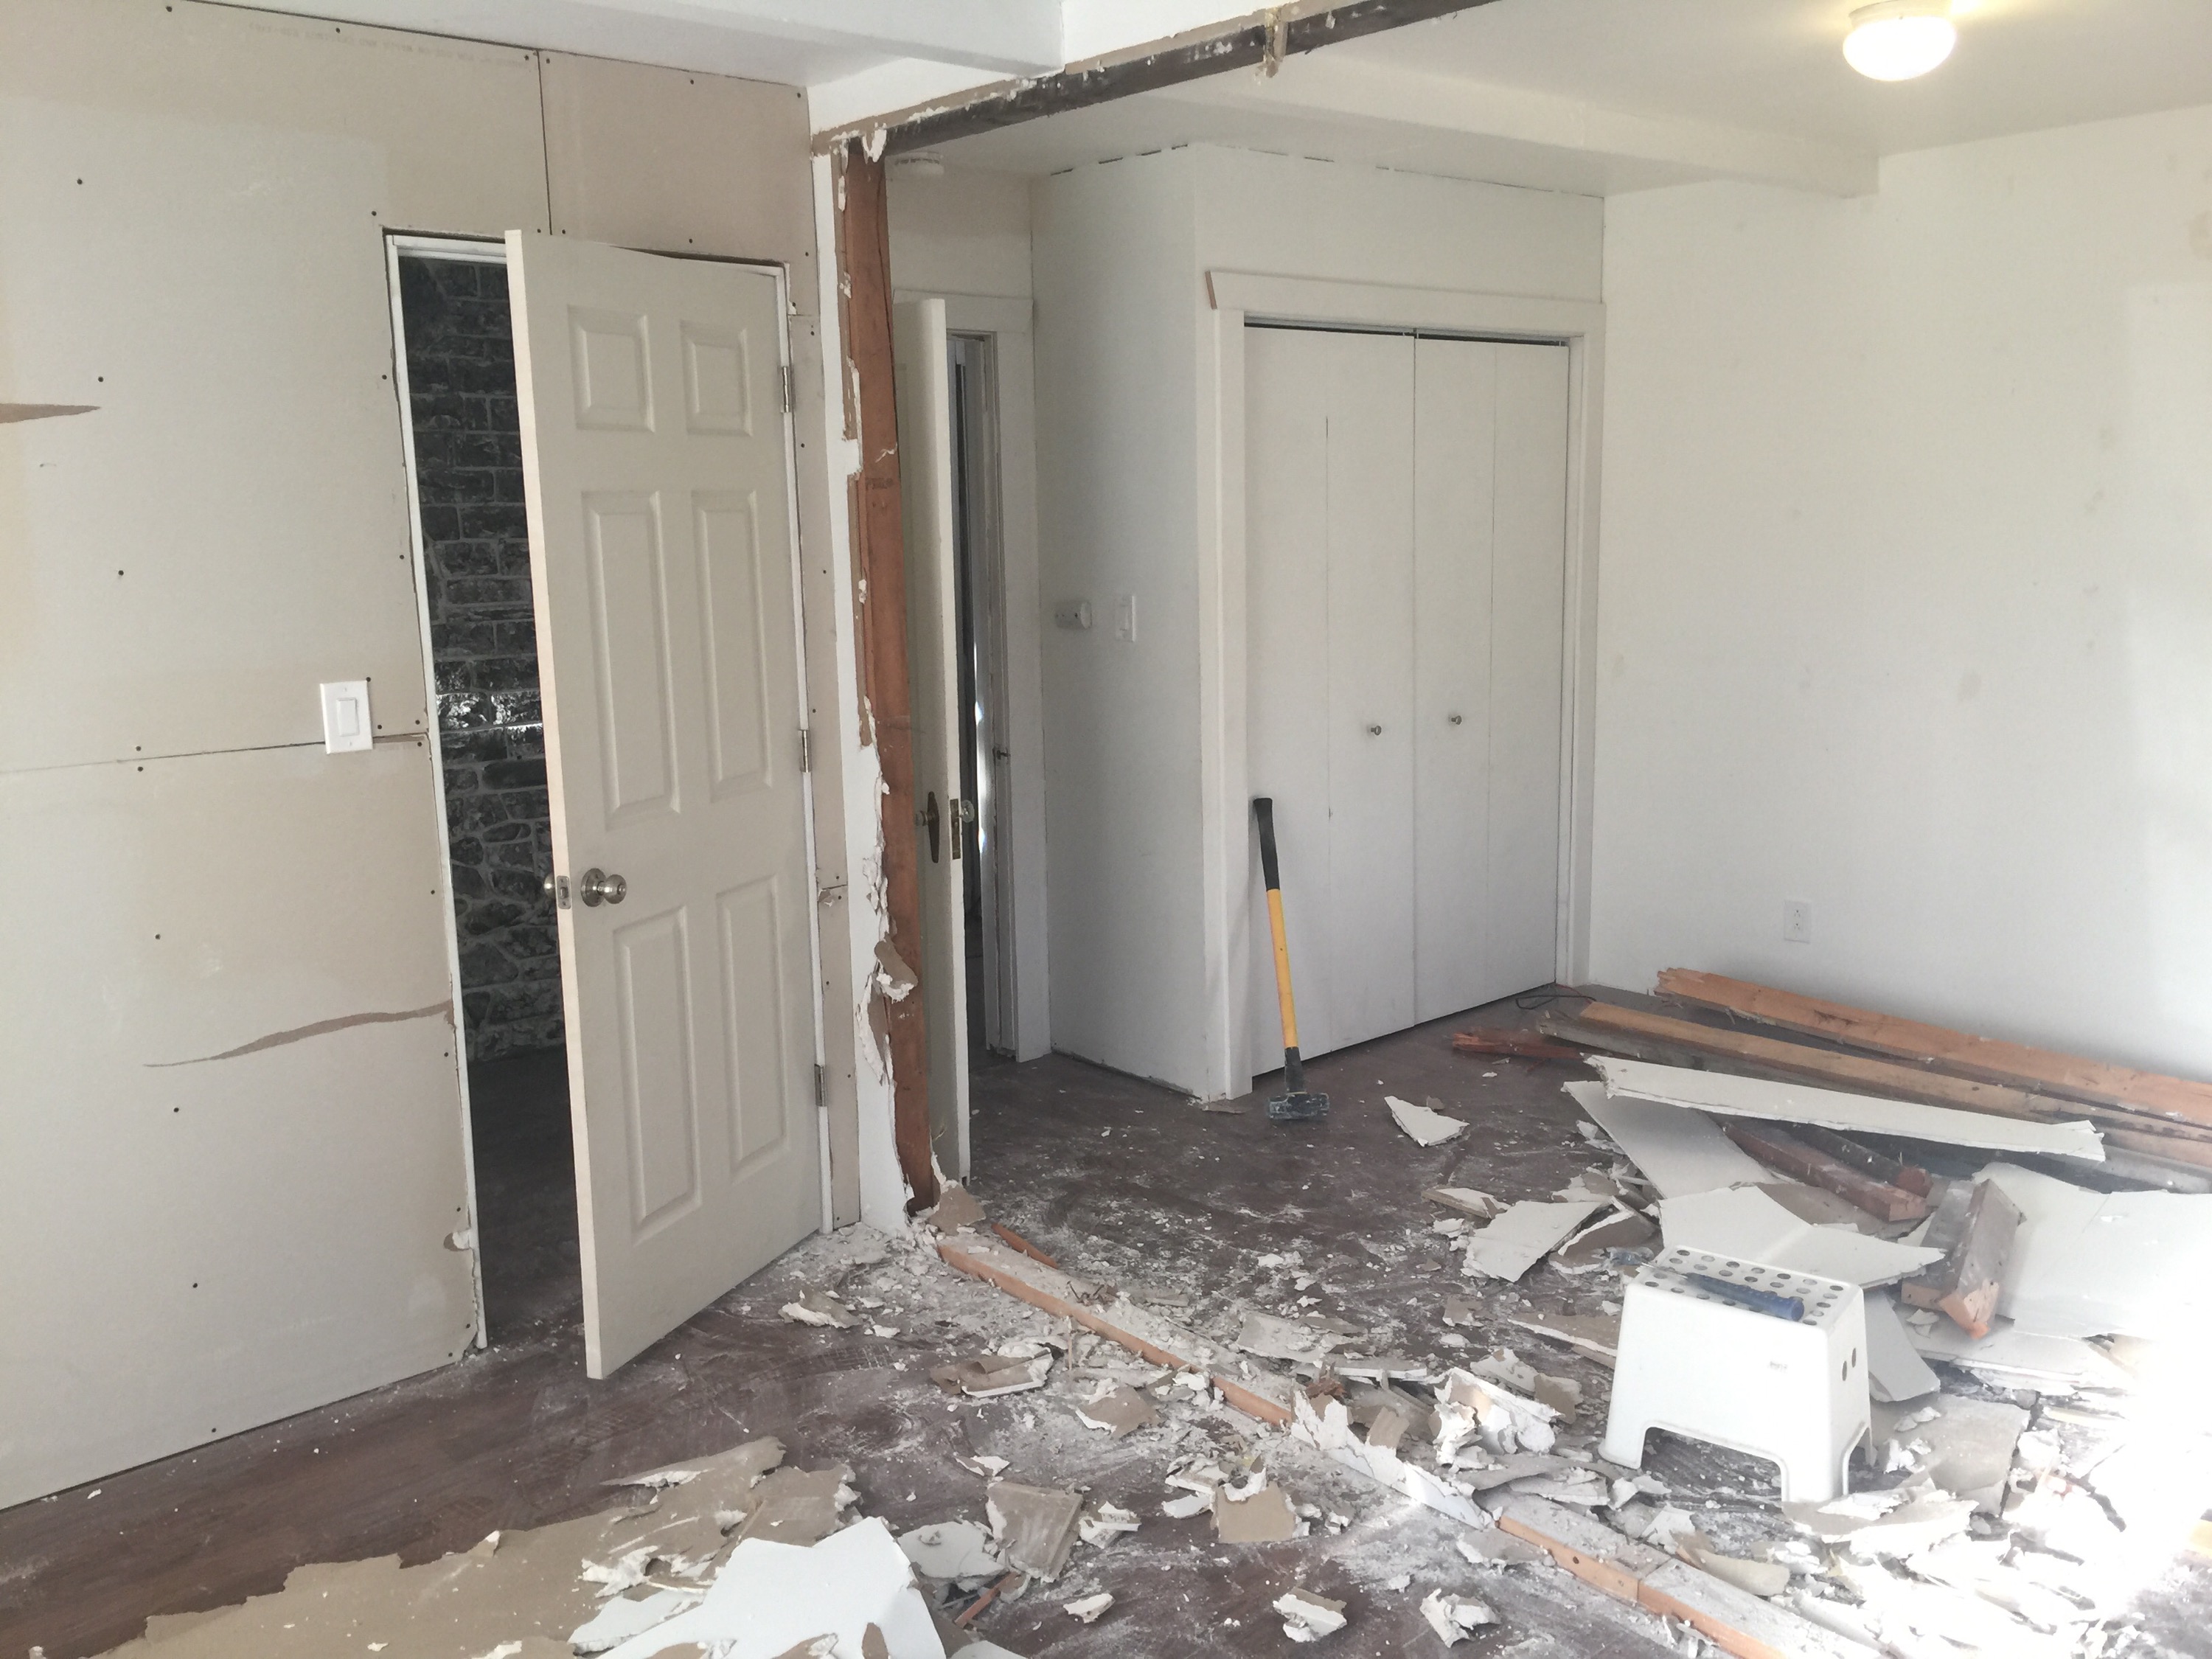
However, just like when I tried to remove part of a heating duct last month, I find that I’m going to have to break the existing structure back further and further until I almost might as well just gut the whole thing right now.

For instance, inside the wall hidden by the door in the foreground, is this nonsense:

  
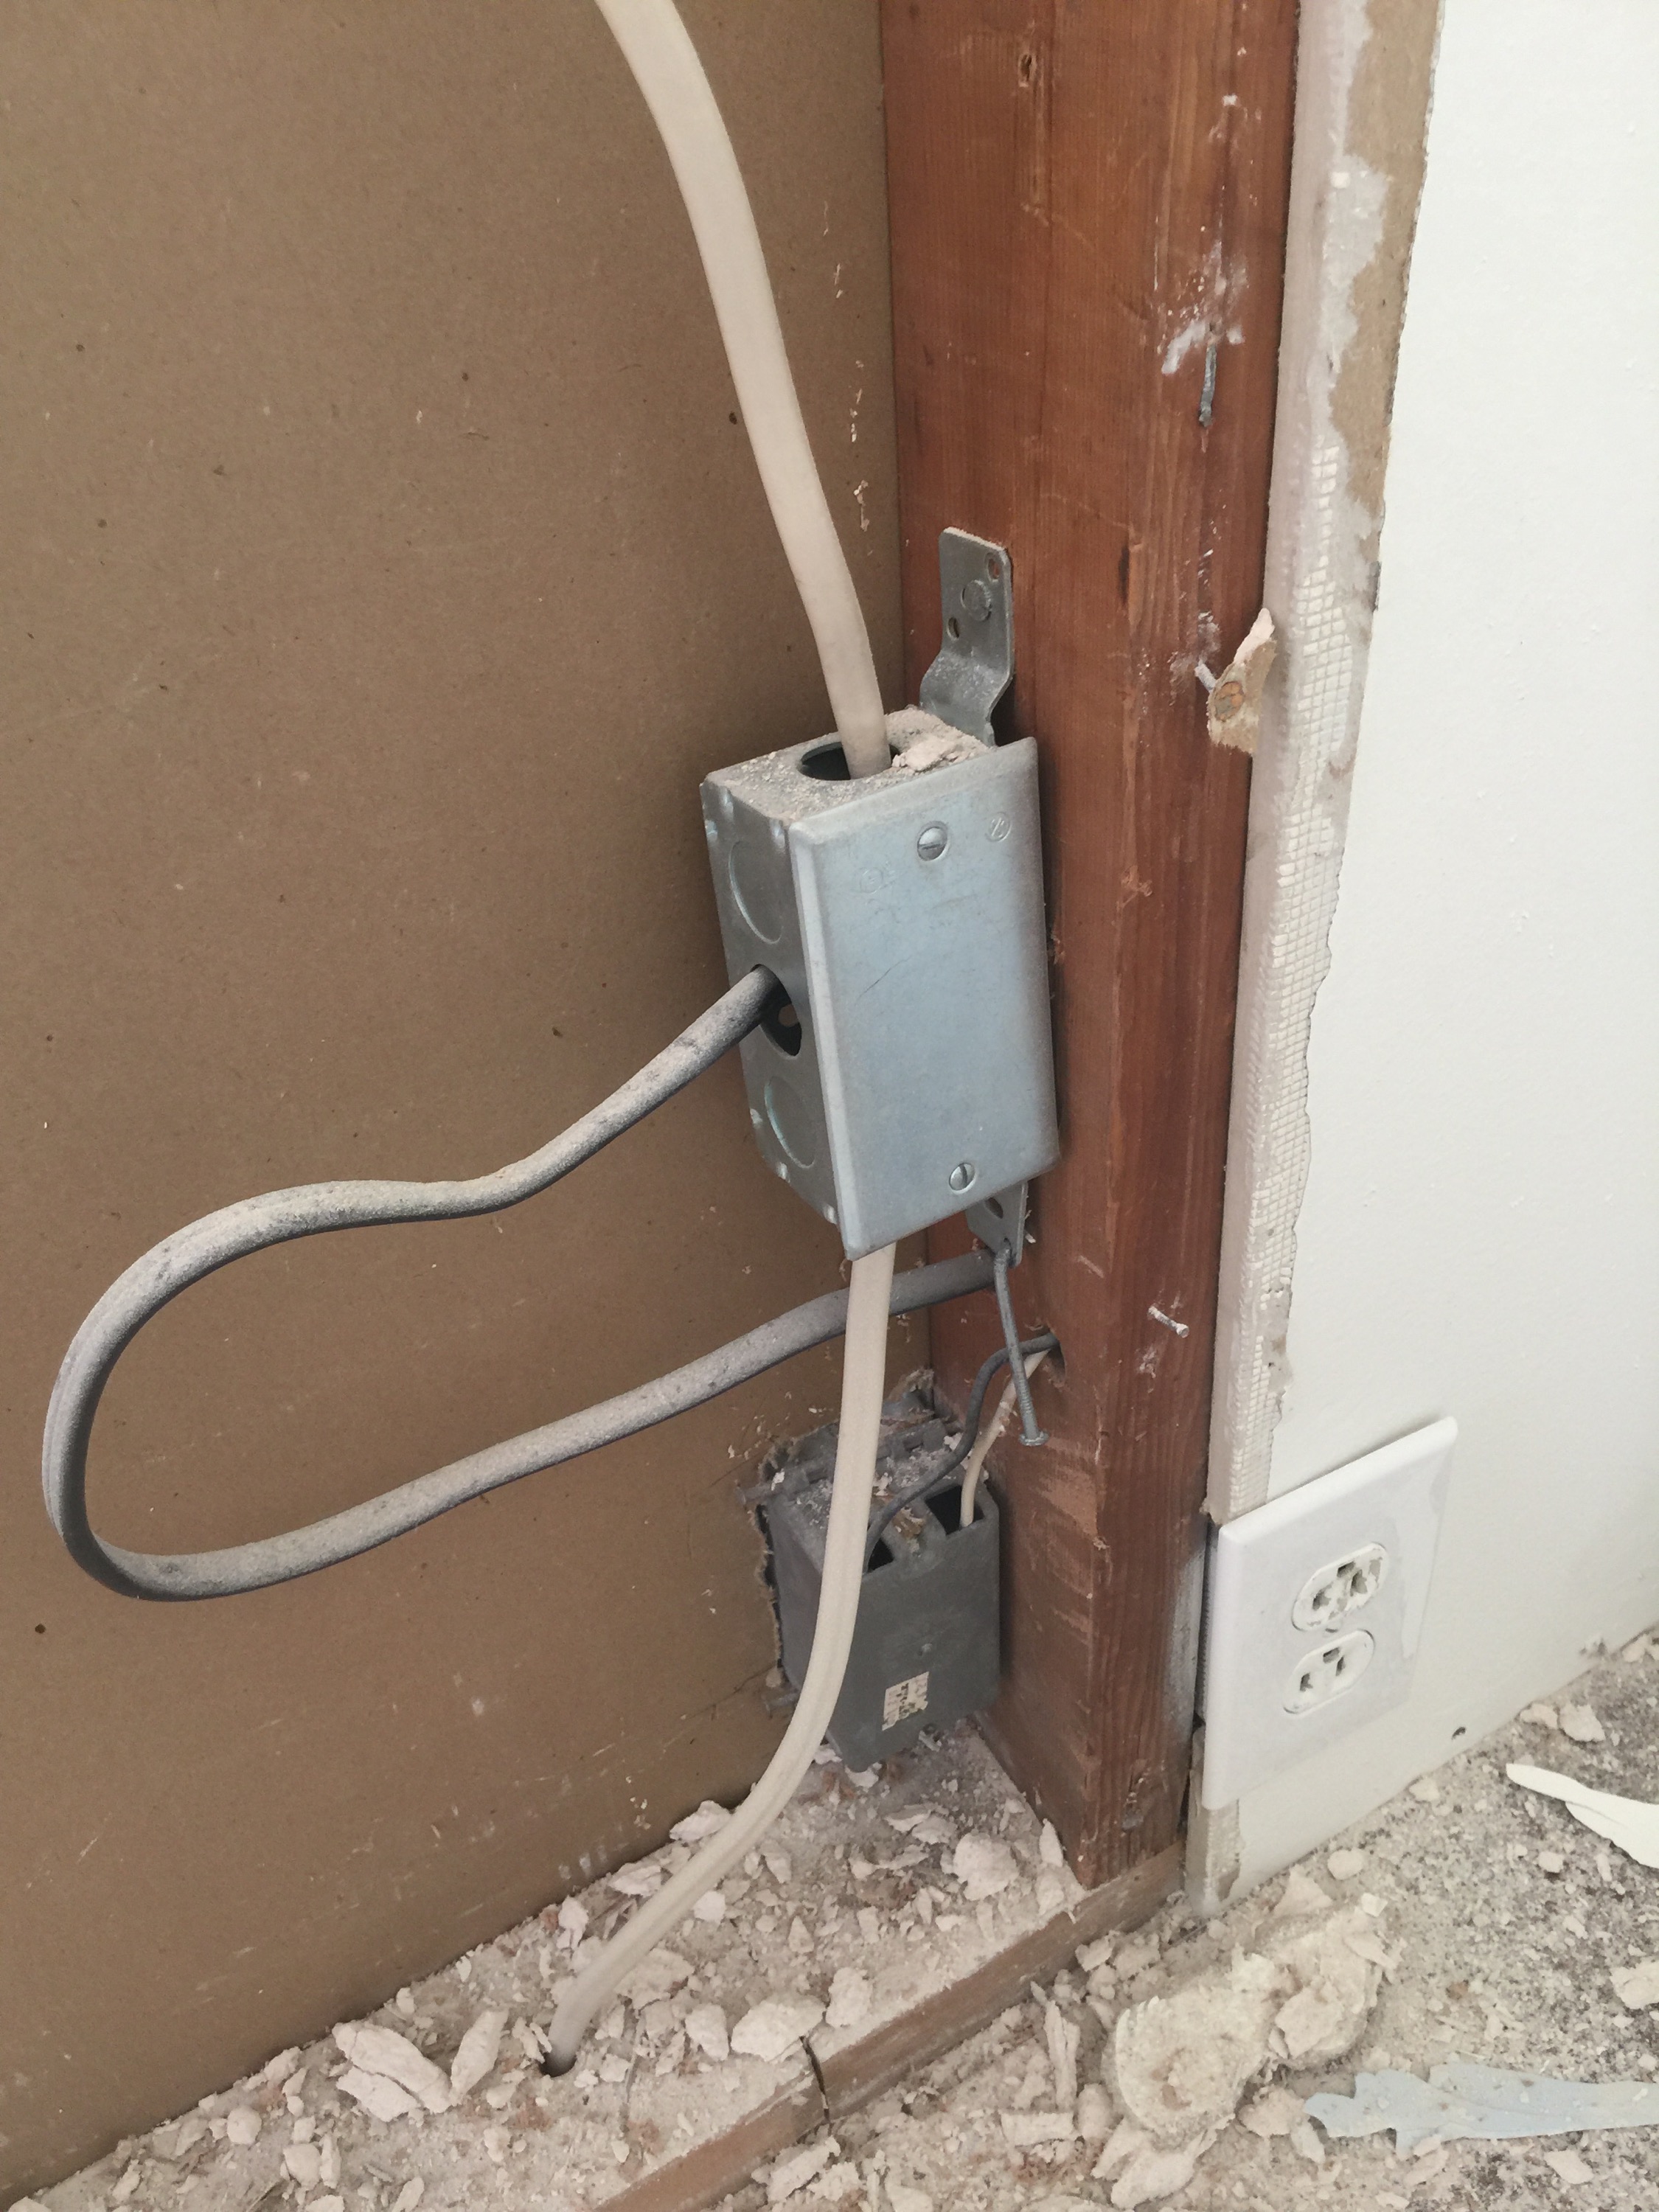
Hidden junction box, weird connector, individual conductors stripped out of the sheath and passed through holes, and (not pictured) wires in a notch between a 2×4 and the drywall with no protector plate.

I’m ever more convinced that the previous owners (ptui) wired up the addition with a bunch of 6′-8′ lengths of wire they got surplus and just connected together any old how. At least they’re not just wire-nutted together end-to-end hidden inside the wall, like I found before when I was wiring up the hall lights.

And it looks like they built the wall between the rooms and then put in the ceilings. There’s all this structure between the beams and attached to the roof deck up inside the ceiling, that to remove and insulate the cavity, I’m probably going to have to remove a couple of feet of drywall on either side of the joint. And pretty much rebuild the wall that’s got all the weird electrical in it as well.

Idiots!

Tags: , ,

Still Here

Right. The earth did not open up and swallow us whole along with our house.

The back bedroom project is still underway, though. After gutting it back in March and April, we pretty much ran out of time and money. In May I was able to get all the framing done: I filled in the existing exterior door, framed two windows, added a real closet, and created a rough door opening where the end of the hallway once was. In June or thereabouts I was able to buy a roll of wire and run the almost all the electrical. And there I stopped for a couple of months.

Luckily, Jen had some stock options from her job that became sellable in August, so we finally had the money to get all the remaining stuff. Last week I took advantage of some time off work and finished the rough electrical and had it inspected (passed except for one minor issue with the closet light fixture placement). I also installed the folding attic stairs (I was able to do it entirely myself with the assistance of our drywall lift — thanks Jen!)

This morning, I went to Home Depot and ordered all the plywood, drywall, joint compound, doors, tar paper, light fixtures, switches, receptacles, etc. that I’ll need to complete (almost) everything. It gets delivered on Tuesday, so I get to spend this weekend doing everything that I can get done short of having the materials on hand: clean up the room, fill in all the floor/ceiling holes with firestop foam, pull the vinyl siding off the relevant sections of wall, flash the rough window openings, etc.

No pictures for this post, but I’ll take plenty as I work on everything next week.

Tags: , , , , , ,

Bedroom Remodel Weekend 1

Last weekend I started on the back bedroom/hallway project. The plan is:

  • Gut down to the studs
  • Frame in the door to the outside
  • Add a window to that wall
  • Take out the existing closet wall and move the doorway back to the bathroom wall
  • Add a real closet and a reading nook
  • Rewire properly
  • Add attic stairs to the hallway ceiling
  • Lay down a plywood floor in the attic for storage
  • New drywall and moldings

Before

Saturday we had a lot of social appointments, so I only had time to pull down all the trim and moldings.

Casings down

Window casings too

Sunday I got out the big prybar and framing hammer and took down all the tongue and groove boards on the walls. I’ve pulled all the nails out and I’m hoping to be able to get something for them on Craigslist.

The hallway

The closet

Outside walls

Kitchen wall

Interestingly, the shared wall to the kitchen shows two framed-in doorways, one narrow and one normal size. I suspect that originally the hallway ended in a linen closet and the access to the back bedroom was through the kitchen approximately where the wall ovens are now. Supporting this theory is the fact that the vertical framing around the current bedroom doorway is kinda rough-sawn and that the stud on the kitchen wall opposite the end of the bathroom wall has lots of nail holes in it.

Oh, and also, apparently nobody who ever worked on this house ever heard of a header over windows and doors. The existing doorway is non-load bearing and so doesn’t need one, but the existing window, outside door, and framed-in doors on the kitchen wall are all on exterior or load-bearing walls. None of them have any more than the top plate 2×4. It’s a wonder this house isn’t sagging more than it already is.

Sometime this week I’ll take an hour and pull down and bag up all the blown-in insulation in the walls. Then next Saturday I knock down the closet wall and pull down the ceilings. That means a huge pile of rockwool insulation on the floor so that might be all I can get done in a day.

Pulling nails amid the pile of junk lumber

I also need to get my permit renewed so I can be all proper and legal.

Tags: , , , , ,

Visible If Expensive Progress

Half the tax return went to making the rubbish pile go away. The treehouse six or eight months ago was the beginning of it, and then there was huge amounts of demo from the basement. See, the previous owners finished half the basement, but they did it wrong. Wrong wrong wrong. So I had to take out all the non-pressure treated wood in direct contact with concrete, all the badly nailed-up drywall, and all the slightly mildewy insulation.

And wow I can’t wait until I can replace all the electrical nightmares I uncovered. If Mike Holmes’ electrician were to come see my basement, he’d have conniptions — hidden junctions, wires hanging loose, unprotected tie-ins, etc. I’ll be salvaging all the romex wiring and using it to rig up temporary lights, switches, and sockets, and getting rid of all the old conduit. This will also get me one step further toward retiring the old electrical panel.

Anyway, here’s the photos of the rubbish pile. I forgot to take a “before” picture, so I have a “halfway” and an “after” picture:

Halfway gone -- notice the 19 cu. yd. truck full of stuff

All gone! That's the second (full) truck in the opposite driveway

(There’s actually a little bit of rubbish left behind the pergola, but that’s stuff left over from the previous owners that was covered by morning glory.)

Next on the list is remodding the back room and hallway. It’s almost all cleaned out — all the furniture is moved to the library — and so next weekend I can do the demo, and then in the second half of the month when we have more money I can start putting it back together. I’m sure it’ll be easier than the bathroom. 🙂

Tags: , , , ,

No More Stairs

After all the adventures in plumbing, the next project in the queue was taking out the crappy stairs down to the basement. For reference, here’s a photo of the stairs:

Basement stairs, looking north. Headroom is 58"

Step 1: Knocked down the existing stairs. Pretty easy work with a hammer and a prybar. I really did this simultaneously with step 2, since it was easiest to install most of the joists while sitting on the stairs, but the last two had to be after taking out the stairs and lifted over my head. (Have I mentioned that I have biceps for the first time in my life?)

Step 2: Sister the cut joists with fresh 2x8s. I had to use pressure-treated wood since there is no sill plate on top of the foundation and the joists would be resting directly on concrete. And since I didn’t trust pure sistering, I cut them long enough to sit on the girder in the middle of the room. I followed Mike Holmes’ advice and glued and screwed them to the existing joists and toe-screwed them into the rim joist. This is where having the One Drill To Rule Them All really came in handy.

Step 3: Put down the subfloor. This step is a little out of order since I had to get it done before the in-laws showed up that evening; I would have rather done all the blocking first. I forgot to use adhesive on the joists, so I doubled up the screws to 6″ apart throughout.

Step 4: Take out the half walls around the edge. Easier said than done, because although each wall had only about three studs in it and could be wobbled by hand about an inch either way, they were put together with a really excessive number of 3″ screws.

Step 5: Insulate the rim joist using doubled-up pieces cut out of a 2″ thick Foamular 250 board for a total of R-20, and seal the edges with expanding foam. I made sure to take photos of every joist bay to prove to the inspector that I insulated, since you wouldn’t be able to see it after the next step.

Step 6: Install blocking around the edge of the subfloor patch to support the edges. Because of where the main water pipe runs under the old top of the stairs I couldn’t maneuver in notched 2×8 blocking, so I put in 2x6s against the subfloor and then cut and hammered in 1″-2″ pieces of the pressure-treated board to fill between the 2×6 and the foundation. It’s a little squishier than the rest of the patched area but well within tolerance.

Step 7: Cut a piece of birch plywood to act as a finish floor until we can afford to have the hardwood patched in and refinished by a contractor. I tried really hard to get an exact fit — I taped paper over the patch and marked the edge of the hole by crayon rubbing, and then cut out the template and transferred it to the plywood — but since I don’t have a jigsaw and it’s really rather difficult to match a wandering line with a circular saw, the patch is off by up to half an inch. Sigh.

Step 8: Rearrange furniture to suit.

And that’s where it stands today. There’s still a whole bunch of debris in the basement I haven’t lugged out to the ever-growing junk pile. And I’d like to stain the plywood “oak” color to match the rest of the floor, but I am stain-illiterate and I’m worried I’d make a huge mess for a crappy result.

Eventually, I’m going to build a new set of stairs where the old front entry/current walk-in closet is, but that’s going to require a hell of a lot of structural work, with steel posts and concrete saws and LVL beams and so on, not to mention lots of exacting finish carpentry. I have a good book on the subject, and I have a Google Sketchup model about halfway completed, but it’ll still be after next year’s tax return before I can even think of taking it on.

Tags: , ,

Electrical Upgrade Preparations

We’re finally able to go ahead with upgrading the electrical service from 125 amp (and a totally-full, out-of-date, not-terribly-safe panel) to a nice shiny new 200 amp Siemens panel.

The plan is to install a new mast and meter in a better location on the house (where the wires won’t cross over the roof at no more than five feet clearance), run conduit back to the same room in the basement as the old panel, install the new panel there, put in a 100-amp breaker and run a feeder cable to the old panel. That way I can leave the horrible mess of electrical spaghetti untouched for now, and as I remodel rooms put new circuits in the new panel and retire circuits from the old panel until I can remove the old panel completely.

Also, the old panel is attached to a stud wall that I’m going to want to remove (well, it’s attached to the beam above a stud wall, but I wouldn’t want to remove the wall and leave the panel just hanging out in open space). The new location will let me reconfigure the walls however I like, and still leave plenty of room on that wall for washer/dryer/utility sink.

Before the electrician can come out, however, I’ve got a lot of work to do to prep the site. There’s a set of stairs from one of our back doors that needs to get detached and pulled away from the house so the conduit can run (I’ll cut a hole and put them back later). There’s a bunch of drywall that needs to get removed to clear a path for the grounding wire to reach the plumbing (at least the plumbing that will be left once I convert everything to PEX). And, most importantly, there’s a couple of water pipes directly over where the panel will go, which is forbidden by code (confirmed with an electrical inspector at the permit department).

So the plan is to cut out those pipes and divert them around the panel location using push-on or compression connectors and 3/4″ PEX. The problem is that they’re embedded in/hidden behind a plaster ceiling one of the previous owners installed in the whole central section of the basement (for fire protection from the furnace maybe? who knows).

Actually, I’m beginning to think that’s not plaster, it’s concrete. This hole took me half an hour beating on it with a crowbar and hammer:

Here’s a closeup, after some of the wire mesh lath has been cut away:

The reason I’m thinking it’s concrete is not only is it really hard but the sawzall will barely notch it (although it’s easy to cut out the mesh and keys once I’ve knocked off the visible layer).

So here’s the plan, before and after:

Hopefully I can at the very least get all the demo done on Saturday, and then I’ll be taking two days off work: the day the electrician comes to let him in and supervise and do any last-minute helpful homeowner things, and the day before to complete the plumbing and remaining demo.

Then the city’s inspection, then the Seattle City Light guy comes out for his inspection, then he schedules a crew for the re-splice to the service wire, and on that day the electrician comes back and makes the final hookup from the new box to the old, and then we have a completed upgrade.

Yay!

Tags: , , , , , ,

Some Progress Lately

The treehouse is down. Went up on the ladder with the sawzall a couple of weekends ago and made pretty short work of it, considering that it was fairly sturdily built — except of course it was built of non-treated lumber so the roof was bowed in and the 2x4s were soaking wet. It’s really amazing how big the pile of junk lumber is from such a small building.

No more treehouse!

The absurdly large debris pile

The bathroom shelves are up, or at least two of them are since for some reason the middle shelf didn’t fit. I’m not terribly happy with how they came out, but at least there are shelves there and we can start using them for storage. When I have a few bucks lying around I’ll go get a sheet of birch plywood and do them better. I figure if I construct the shelf and the braces in one unit and attach it to the wall all together there will be fewer gaps.

The bathroom touchup painting isn’t done, but all the holes are filled and sanded. I now know that putty has to be applied pretty thickly because it shrinks as it cures. Hopefully I can finish that next weekend, and paint the door and window jambs where the old pink paint is showing through.

Last, I demoed out the wall in front of the old basement access door, and removed the plywood covering the stairs that gave us so much trouble with the underwriters last fall. Apparently, Nate is a big do-do head crap’r, whatever that means. Once I get the door freed of its very thick layer of silicone/rubber/whatever-the-hell-it-is caulk and get a padlock installed, I can move forward with taking out the existing stairs and filling in the living room floor with a temporary plywood patch.

Oh, those wacky previous owners!

I also have a good quote from an electrician to upgrade the service to 200 amps. Now I need to figure out what the schedule is for inspections and for Seattle City Light to hook up the new mast, and then I can schedule the electrician. I’m moving the location of the panel to the foundation wall, so I can remove the plastered-over stud wall the current panel is attached to when I completely gut the basement.

Tags: , , , , , , ,

What The (Insurance) Underwriters Want, The (Insurance) Underwriters Get

At the same time as the work in the bathroom, I’ve also had another project foisted on me by our home insurance policy carrier. Apparently the insurance inspector took a little tour around the grounds and had some issues he wanted fixed or they would CANCEL OUR POLICY!!

  1. Remove the rubbish pile.
  2. Cover the basement stairs or put in a handrail.
  3. Put a door on the garage.
  4. Scrape the moss off the garage roof.

To which my responses were:

  1. Um, we’re remodeling. Do you really think (a) there would be no rubbish pile, or (b) that we weren’t already planning on getting rid of it?
  2. You’ve got to be kidding, right? Fine, I’ll put the damn cover back on.
  3. You just want to block access? Will an OSB slab do?
  4. The garage is about two years from falling over by itself. And you’re worried about … moss. O-kayyy.

I think most of the concerns were of the “attractive nuisance” variety. Like kids are going to wander into our fully-fenced property and play around in the backyard. What. Ever.

A couple weeks ago we had a company come and get the rubbish ($cha-ching). Last weekend I powered through the rest (half the time in the pouring rain). Here’s the evidence:

No moss on the left

No moss on the left

IMG_0274

No moss on the right

Look, Ma, no more rubbish!

Look, Ma, no more rubbish!

It's a big piece of wood with hinges -- that must mean it's a door

It's a big piece of wood with hinges -- that must mean it's a door!

The stairs covered back up -- attached with screws this time

The stairs covered back up -- attached with screws this time

(Getting that door on single-handed was a bitch and a half, I tell you.)

I’ve sent these photos on to our agent, who says the inspector never comes back to check in person. She’s forwarded them on, so we’ll see if they’re satisfied or if there’ll be more work to do, um, tomorrow night.

Tags: , , , , ,

Bathroom Demo Part 3

I haven’t been posting the last few days because I’ve either been too goddam busy or too goddam tired.

The difference between the DIY reality shows and reality is that the shows never show people covered in filth on top of a ladder working with heavy tools at arm’s length in the middle of the night.

Monday I pulled down the ceiling and dropped a huge pile of rockwool all over everything — I pulled one nail off the corner of each sheet of drywall and the whole thing came down. There were a bunch of nails in the joists, but the drywall must have been completely rotten. After I cleaned all of that up, I scraped up all the vinyl flooring and the linoleum underneath it (at least I hope it was linoleum). Also, the building inspector showed up for the preliminary inspection, and signed off on all our plans, including the stairs; what was especially useful is that he let me know that on old existing buildings they’re understanding about what’s possible and what isn’t, and with respect to the winding stairs that the 6″ inner width of the tread was the most important part and that if we missed the 10″ middle width by a quarter-inch or so they could let it slide.

Read the rest of this entry »

Tags: , , , , ,

Bathroom Demo Part I

Edited to add: The original graphic theme for this blog wasn’t working out, so we’re trying “Arclite”. Please let us know if there’s any issues with the UI. Thanks!

Yesterday after getting the permits all straightened out I got to spend about three hours working in the bathroom. Today it was about the same — got there about 3:00 and left at 6:00.

The permits and plans “prominently posted at the job site”:

IMG_0678

The bathroom before yesterday and today’s demo. I’d already removed the chair rail molding, the sink and the toilet:

IMG_0664IMG_0665

I pulled off all the remaining moldings and door casings (carefully for the main door, since I’m putting them back). I got all the drywall off of one and a half walls, and all the towel hooks, mirror, etc., which are in pretty good shape and will be appearing in a Craigslist ad very soon.

Bathroom at end of day today:

IMG_0667IMG_0668IMG_0670

So I now think that, in the 1930 floor plan, what is now the parlor was the main bedroom. Either in the original plan or very soon thereafter, they framed in a closet against the wall opposite the bathroom with 2x2s, which is why the bathroom side of that wall is narrow horizontal T&G instead of the wide vertical T&G on the room side that’s used everywhere else.

Much later, very possibly in 1994, the owner knocked out the part of the bathroom/closet wall and drywalled the bathroom.

You can see the framing of the wall between the old closet and the old bathroom in these two photos:

IMG_0671IMG_0672

You can see the end stud and the top plate of the 2×4 wall that was removed, along with nail and pipe/wire holes.

I say in 1994 because I found a bible hidden in the walls with a note inside reading “Hid 12-17-1994”.

IMG_0689IMG_0686

The T&G cladding in the old bathroom was removed (assuming it was ever there), so in there the drywall was 1/2″ and fastened to the studs. In the old closet, the T&G was not removed so they put 1/4″ drywall directly over it. This still didn’t make the walls even, so they had to add wider moldings to the bathroom side.

It wasn’t a load-bearing wall, so I don’t understand why they cut the bottom plate and removed the intermediate studs, but didn’t cut the top plate or remove the end stud. It would have been so much easier to make it look good.

WTF #1: Notice how the cold stubout comes up from the floor but the hot stubout comes down from somewhere:

IMG_0691

Here’s the plan for the next couple of days:

  1. go up in the attic and scoop away all the rockwool insulation from above the bathroom ceiling so I can demo without having all that fall down on me
  2. find the shutoff valve for the tub/shower and then remove the faucets and handles
  3. remove the window casing, the rest of the drywall, the T&G cladding, the vinyl floor, and the plastic shower surround
  4. turn off the power and trace and cap the wiring (removing the hidden junctions or unboxed splices that I’m sure are up in the attic)
  5. drop at least part of the downstairs bathroom ceiling and disconnect the bathub drain
  6. trace the water lines back as far as I can to the earliest common point where I can cap them
  7. hope like hell the subfloor is okay and doesn’t need replacing

The building inspector is scheduled to come by sometime on Monday to review and approve the plans, and I want the bathroom completely opened up by then so he can see the stub wall I want to move isn’t load-bearing. Hopefully he won’t make me reframe the 2×2 old closet wall.

Tags: , , , , ,